Grooming the Bedlington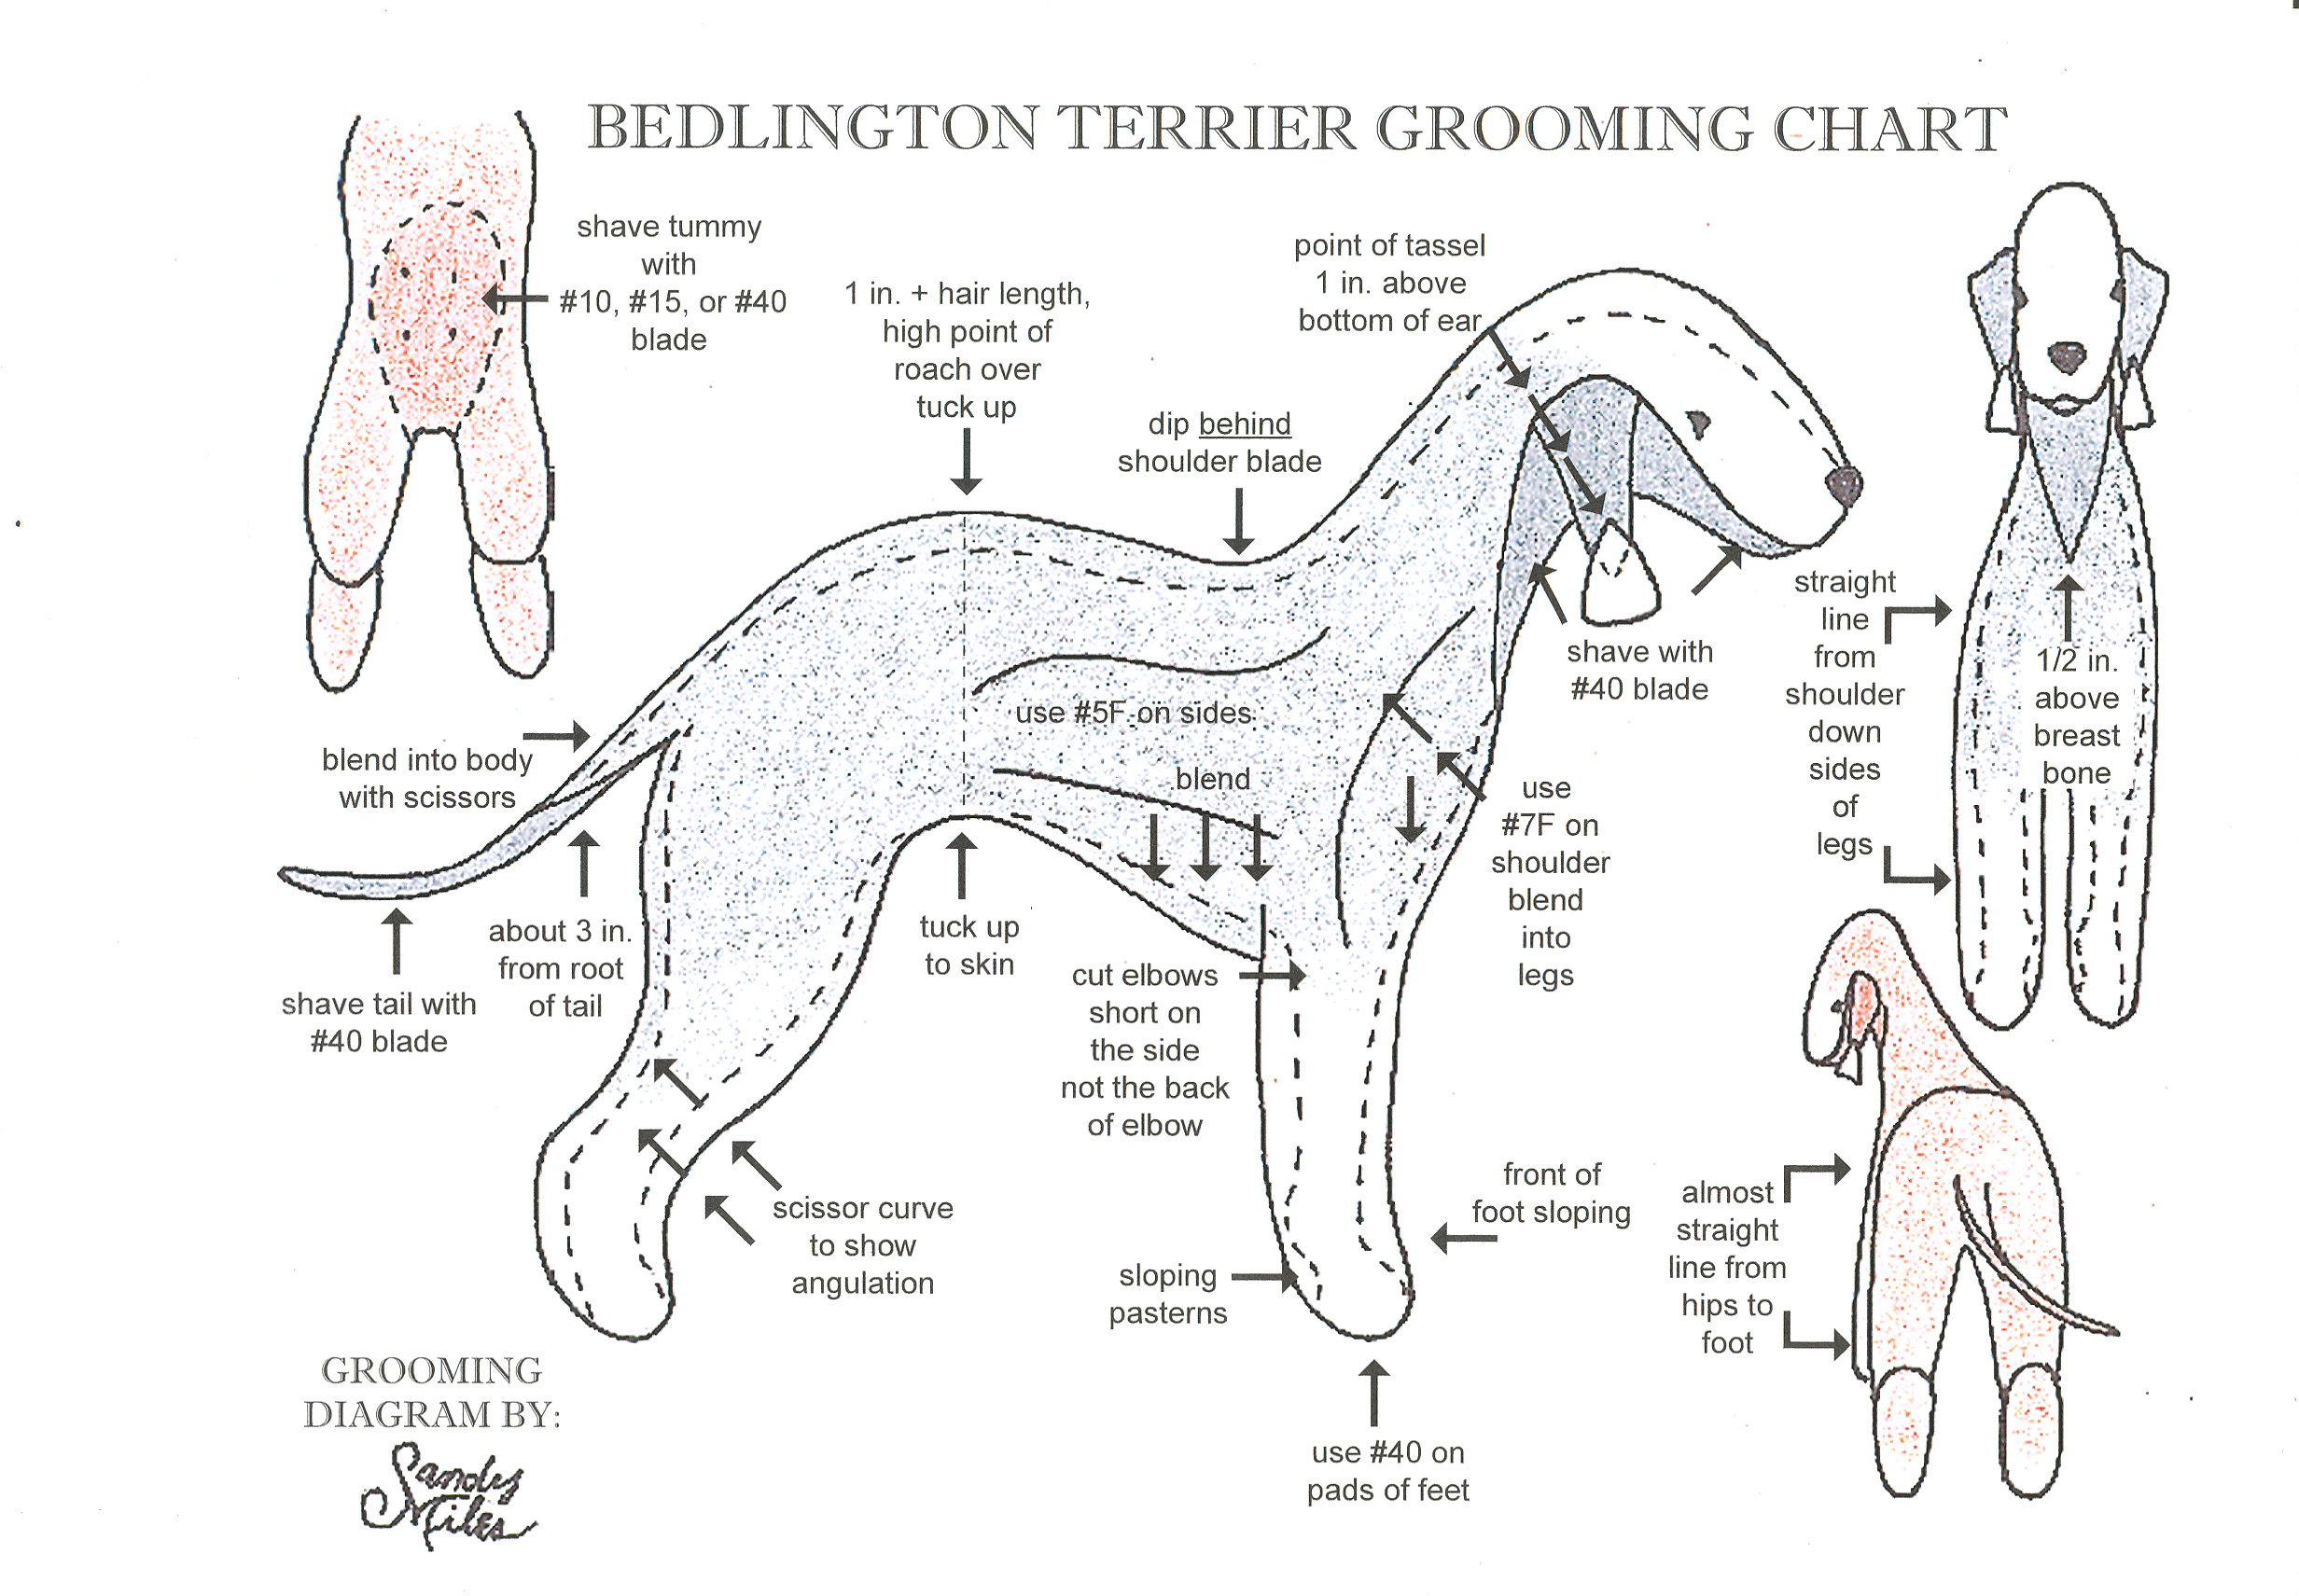
by Carole Diehl
Show Grooming
The Bedlington has many advantages over most other terriers when it comes to show grooming. The most obvious is that he never “goes out of coat” as do the stripped terriers. This is quite an advantage, especially if you are trying to campaign a special. In fact, showing every weekend helps to keep a nice finish to the coat. Another plus is that one can wait until the night before the show and carve a winning entry out of a dog that has been sitting untrimmed for several weeks, as long a regular maintenance has been followed which includes keeping the coat brushed, combed, clean, and free of matts.
 I generally do not worry about length of coat, as long as it is tangle free and unstained prior to beginning the trim. The initial step for me is to do the shaving of the face, ears, tail, belly, and between foot pads. Unless the dog is very dirty, I do this prior to bathing, using a #40 blade for all but the belly and under the tail area. On these more sensitive areas, I prefer a #30 blade, or if the dog clipper burns easily, I will use a #10 blade always working against the direction of growth of hair. Many people are nervous about using the #40 blade along the edges of the ears. I find that since the teeth are closer together I am much less likely to do any real damage to the ear leather than if I use a coarser blade in which the leather can get in between the teeth. Always watch when doing the back of the ear for the flap in the back and go gingerly until you are experienced and can locate the edges without cutting into the skin. If a dog has a tendency to clipper burn, I clip and immediately wipe or spray the skin with Sea Breeze or a similar product as I go. After clipping, I do nails and clean out the ear canal. If the dog has a tendency toward waxy ears and/or heavy hair growth in the ear, consider doing the ears a few days prior to show grooming so that he does not scratch newly clipped skin and cause irritation. The judge is not going to be an ear inspector; as long as the canal is clean, odor free and relatively clear of hair, it will pass. I generally like to use one of the commercial ear powders to help in gripping the hair for removal and to guard against irritation in the canal. Forceps, tweezers or fingers can be used to remove the hair. After these preparations are done it is time for the bath.
 Using warm -NOT HOT- water and a mild shampoo gently bathe and thoroughly rinse the dog. If he seems to have an itching problem after being groomed, it is because he has a shampoo residue left on his skin. It is very important for his comfort that all traces of soap is removed. I do not use cream rinse, but some others may like it’s effect. After bathing to preserve the coat blot the water with towels using gentle pressure to remove excess water. Rubbing with the towel may cause tangles and possible breakage of the coat. Following towel drying comes the step that in my opinion will make or break a smooth finish. It makes no sense to rush the drying procedure as this gives you your foundation with which to work. I like to use a forced air dryer set on medium with the temperature as warm as is comfortable for the dog. If some areas dry prior to being brushed out re-wet them using a spray bottle and continue drying using a gentle slicker brush. Any area that dries on its own and becomes curly will prevent you from obtaining a smooth finish. On especially curly areas such as the face and feet, I often switch from a slicker brush to a Greyhound comb in order to separate the hair and dry it as straight as possible.
 After drying, I use a #7 blade and go down the sides of the neck and shoulders almost to the elbows. If the dog has a good coat, I will often take a #4 or #5 blade and continue back along the side to the end of the rib cage, being careful not to go too high up the side so as to interfere with the hair on the back. I locate the tops of the shoulders and either clip or scissor an indentation just behind them, so that this point is just barely covered with hair. I then go to the tail area, scissor in the top of the tail and begin to carve in the topline. At this time you are just “roughing” in pattern. Taking my scissors vertically I trim a line down the center of the back legs to the top of the hock, and using clippers and the #7 blade, clip down the chest from the shaved area to just above the front legs. This sets the proportions for the slightly rectangular body outline and gives a framework for overall pattern. Fluffing up the hair on the sides and again holding the scissors vertically, I trim across the ribcage area, blending the sides into the shoulders and back along the tuck-up to the hips and around each side to the tail. Then switching the scissors to a more horizontal position, I begin at the notch behind the shoulder and curve the topline with the highest point being centered over the tuck-up.
 Following the dog’s body shape, I trim a gentle curve on the underside of the dog from the chest to the tuck-up. When the dog looks balanced, I blend these curves into the sides, so that there is a smooth transition into the longer hair rather than a line or “shelf”, such as is seen on the terrier breeds that have furnishings. When I am satisfied with the body, I comb up the back legs and begin trimming, first on the inside and then on the outside of the legs. If your dog has a correct hare foot, trim to show it off.
Now is the time to have an assistant move the dog so that you can see if there are any bumps and bulges when the rear leg flexes or if more hair needs to be taken off on the inside of the legs to widen out a narrow rear or correct cow hocks. If you don’t have an assistant, now would be the time to let the dog off the table to loosen up a bit. Although not the ideal, you can see some of these things when he moves around on his own. My personal opinion is nothing spoils a beautiful racy look any more than leaving an excessive amount of hair over the hips, giving the dog the look of a beef cow. After you are satisfied with the dog’s outline from the rear, scissor in another curve looking at the side view from the tuck-up to the front of the hock. Then scissor a straight line from the back of the hock to the ground in the rear and from the hock to the top of the foot in front. Step to the front of the dog and bend the elbow to simulate movement. Cut off any hair that sticks out to the side of the elbow. Put the foot down and trim around the sides of the front feet, being careful not to make the feet turn in or out. Starting on the inside of the front legs trim the unique Bedlington front, wider between the legs at the chest and narrower at the feet. Then taking your cue from the rear legs, trim the front legs to a width that balances the dog front to rear. Finally, blend the front and back of the legs, gently rounding the two straight columns of hair, and slightly sloping the pasterns at the rear of the front legs.
 Take a deep breath – you ‘re almost finished – and face your dog head on. With the scissors parallel to the side of the face, start at the clippered line between eye and ear and begin to narrow the hair on the skull. Your objective is to give a long narrow look to the head. Take the scissors and do the same on the line between the eye and the corner of the mouth. Trim off any hair that curls down over the top lip, making it even with the lip and very short around the mouth. Now standing to the side, start at the back of the nose and make another curve to give a slightly Roman-nosed appearance to the head. Facing the dog again, round the head from side to side always keeping in mind that you want an unbroken line from nose to crown, a balance between back skull and muzzle rather than a heavier back skull and snipey muzzle. Be careful to trim a little bit at a time, especially in the area of the eye. Unless the dog is required to have hair trimmed out around the eyes for the purpose of working in obedience or field work, error here on the side of a little too much hair, rather than too little, or you will lose the desirable small eye that gives the breed so much appeal. My final step is to trim the slight curve from the crown of the head to the point beyond the shoulders, making sure there is an arch to the neck and blending in the mane with the sides of the neck.
When you think that you are through, again have someone move the dog or let him walk around and observe him for a while to make certain that all the parts seem to fit together properly. Especially check the topline for correct placement of the arch. Check the hocks and elbows to make sure you have done your best to complement his movement. Check the head to correct any tendency to add “walnuts” in the cheeks (you know- that squirrel look) or lumps behind the ears. I know after all this work on your part it will be difficult to believe that there is not a more handsome Bedlington anywhere on earth and “win or lose” that’s the way it should be.
Pet Grooming
 A few notes here for the person who wants a trick that will make your dog attractive and comfortable without putting in the larger amounts of time required to make him competitive for the show ring. If you are on a limited time schedule and would rather take a long walk than spend hours getting every hair the proper length, there is a method for you that will take much less time and still give you an attractive companion. If you are going to trim your own pet, an initial investment of money will be required. You will need to buy a set of clippers. Several brands are now available. Do spend the extra amount to get a set that will use the standard Oster A5 type blades. I have had a set for over thirty years, and although I periodically replace blades, they are still quite functional after thousands of uses. You will need at least three clipper blades, #7, #10, #30 (I actually recommend four sizes, but a #40 blade is optional), a Belgium Greyhound comb, a gentle slicker brush, a set of curved forceps, a small bottle of ear powder, and a good pair of hair scissors.
 The initial steps of grooming for the show clip can be followed with the exception of using a #30 blade instead of a #40 blade. This will give a neat appearance and will last for quite a few weeks, but is less likely to irritate the skin. This is where the optional blade comes in. I do recommend that you go along the edges of the ear with either a #40 blade or carefully scissor along them instead of using your #30 blade. The teeth of the #30 blade are spaced widely enough that you can do a lot of damage before you realize that you are trimming something other than hair, and it will happen so quickly that your patient dog will just stand there and suffer in silence. If your dog does not have particularly sensitive skin, you may not need a #10 blade for his stomach as long as you use care to watch what you are doing and not clip with a blade that has become hot from use.
Bathe and blow-dry in the same manner as recommended for the show clip. It will pay big dividends in the look of the finished product. Once the dog is dry, take your #7 blade, start behind the ear and go with the direction of growth down the sides of the neck and down the shoulder to the elbows. Find the shoulder blades on the top of the back and clipper from this point over the back to the tail. Starting where you left off at the shoulders, clipper the sides to the hip joint. Trim down the front of the neck and cut a path between the front legs and trim the underbody back to where you have clippered the belly. The shaved down body is really quite racy-looking and will be comfortable for your dog in any weather, as there is enough hair left to provide warmth in winter and sun protection in summer. What you are left with after this is a dog with a trimmed body and long coat on the head, neck, and legs.
Using the #7 blade I lift the back leg and clipper down the inside of the back legs. I then attach my #40 (or #30) blade, and then use a plastic snap-on comb size 1½ or 2 over the blade. Just ask when purchasing the other equipment and the supplier will show you these combs and how to attach them. Using this I blend in the outsides and back of the legs with the body. I generally go over the legs once, then comb the hair up and go over them again for the second time. You will have to scissor a little bit to blend the legs into the body but it will require minimal effort and yet will give a fuller appearance to the legs.
I am sorry, but there are no shortcuts to an adequate Bedlington head. Since a lot of lamb-look is groomer generated, it just will not look the same if it is done any other way but by hand scissoring. If it’s any consolation, you will soon become proficient and will be able to do the head and blend in the neck in very quick order. Just look at the time you have saved by doing all the body and most of the legs by the shortcut method!
 If you should happen to forget to rest or spray the clipper with lubricant, and it gets too hot to the touch, it may razor burn the skin. Although you will feel terribly guilty, your dog will soon forgive you, and although it can be unsightly, it will clear up in a few days. Meanwhile, you atone for your error with lots of love and TLC. A helpful salve for any kind of skin lesion is Desitin (diaper rash ointment). It’s rather messy, but will not harm your dog if he tries to do his own thing and licks it off. If the dog is really irritated your veterinarian may advise you to give him half a buffered aspirin tablet twice a day. This will often help alleviate the worst of the symptoms.
Your dog may not look exactly the way you like the first time you try this method of grooming. For future haircuts you can have a longer or shorter look by varying the sizes of the blades or a fluffier look by scissoring in the legs rather than clippering. Remember that none of our first attempts were exactly what we had in mind. With a little practice you can have a neat and comfortable companion for a very minimal expense.